


Fitting and Setting Up a Cruise Control
Description
The Napster Cruise control has been described as ‘2 bucks worth of injection plastic that will cost you around $30, but it will be best money you ever spent’.
After using one for the past 3 or 4 years I am inclined to agree.
It is merely a ring of plastic with a hinge and a thumb operated cam which allows the ring to lightly grip the twist grip.

Preparation
Carefully remove the twist grip rubber sleeve. Look at the white plastic twist grip, and you will see a raised moulding close to the throttle body. Using a very sharp knife, and with great care, remove that raised ring.
Next, look at the twist grip rubber. You have two choices now, either the very nice posh method, or the method I used !
Posh Method
The twist grip rubber has to be ¼” ( 6mm ) shorter to allow for the control to fit
Locate the moulding ring as shown below.
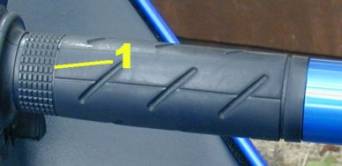
Using a razor blade or sharp hobby knife cut right round the rubber.
Then, from the larger piece ( i.e. The bit on the right in the above picture ), cut 1/8” (3mm) off and discard.
Using a broom handle or similar former, glue the two remaining parts together using super glue. USE ONLY A VERY SMALL AMOUNT !
Footnote: I believe it was ‘Big Rich’ in Cali who first suggested this method.
Quick and dirty method
If you look to the right of the above picture, you will see that the normally bulbous end of the twist grip rubber is no longer there.. I just cut that off. Not as pretty or as clever as method one, but as long as you take your time and ensure the cut is neat and symmetrical it looks good and no one every notices the lumpy bit is missing !
Fitting
I do not know if this part is still relevant, but certainly for all the units bought up to early this year ( 2002 ) the following info is valid.
Study the picture below.
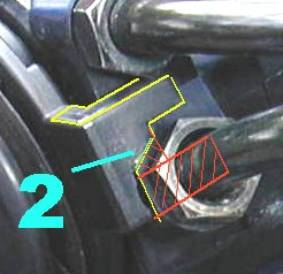
This picture shows how the control looks before its modified to fit the Bird.
The area shaded in RED is the tab that must be removed, leaving the part shaded in YELLOW. Please note the angle of the cut matches the angle of the throttle cable retaining nut. If you make a poor job of this cutting, the cruise control will be able to move back and forth which will allow the throttle to partially close even when the control is set to ‘on’.
Once that cutting is done, place the control up against the throttle body, place the plastic isolating washer on next, then replace the twist grip rubber. You may find a small amount of contact adhesive is needed to stop the rubber from moving. Mine was fine without glue, but if in doubt glue it !
Setting up and adjustment.
As you were working on the control, you will have noticed a brass insert that has a screwdriver sized slot in it.
Make sure that screw is wound a fair way out and test that the twist grip works and returns normally. You may find it is very slightly sticky and slow to return. That is normal and will over a short period of time become completely free.
If however the twist grip does not return at all, you may have to carefully remove a SMALL amount of material from the inside of the control ring. Use a course emery paper to do this, and do it a little at a time, checking after each bit of plastic is removed. Once the twist grip starts to return under the spring pressure, stop !
You can now start adjusting the brass insert to get the pressure exerted on the twist grip by the control correct when in the ‘on’ position.
Although it might seem this adjustment can be done in a ‘that’s close enough’ way, it should be noted that it is in fact a bugger to set up correctly, and even a ¼ turn either way from correct can mean the difference between the throttle sticking on when you do not want it to, or the twist grip closing when the lock is supposed to ‘on’.
Take your time setting it up. Once done, you will not have to adjust it again for some considerable time.
