


How To Fit Delta-GFX Clock Kit To The Blackbird
There has always been a great deal of interest in the clock decal kit by Delta-GFX, so much so that other companies are now supplying clock kits too, some are just as good, while others are pretty grim ! Whatever set you choose, the fitting is exactly the same, and you do not have to remove the needles to fit them either, so long as the fitting method you use is chosen correctly. This is a step by step guide from personal experience. Allow at least two or three hours to complete the procedure, don't try and rush it.

Step One- Remove the Screen and Mirrors
The screen and mirrors have to be removed to gain access to the rear section of the clocks and for the nose cone removal.
Remove 6 screen allan-headed screws from the bike's screen. You will note that on each side there is one an allan bolt and nut (8mm head) situated on the underside of the screen. Hold the nut with a 8mm spanner and unscrew the allan head bolt on each side of the screen.
Remove the 4 remaining screen screws. Do not to exert pressure whilst unscrewing them, just turn the screws and allow them to raise. If you exert pressure you may well loose the retaining screen rubbers which are situated on the actual screen itself and on the frontal clock mount.
With the screen retaining bolts removed you can remove the screen completely from your bird. To do this just gently rock the screen from side to side whilst pulling the screen back towards the petrol (gas) tank, you may need to use a bit of force as it can sometimes be a tight fit.
With the screen removed, unclip the indicator (turn signal) wiring harness on both sides. The carburettor Blackbirds will have bullet connectors, injection models will have a boxed white socket type connection.
The mirrors should now be removed. To do this peel back the rubber sleeve that meets the front fairing and unscrew the two retaining allan headed bolts. Support the mirror whilst loosening the bolts to avoid any scuffs or marks to the nose cone.
Step Two- Clock Surround and Clips
It is important to now remove the three top bolts that hold your side fairing panel onto the nose cone.
Now unscrew the 2 allan head 'pepper-pot' type bolts from the clock surround adjacent to the sides of the petrol tank, that hold the clock surround/fairing cowlings together. Now under your clocks you will see 2 little black clips, just pull the top of the clips and they will pull out with little very little effort PUT THESE 2 CLIPS IN A SAFE PLACE DO NOT MIX THEM .Now just pull the underside of the clock surround (each side) and coax it of the bike, I found that this was a bit tight too, and needed a bit effort and rocking to free them, although putting them back on was so much easier, so do not be afraid to use a bit of persuasive force to dislodge them.
With them clock surrounds removed you will now see a little black screw head clip that secures the other cowling to the nose cone (or top fairing). Just unscrew this clip from each side of the bike and pull them out. Now from the underside of the bike remove the top frontal clips that hold the belly-pan to the nose cone, these are the fore-most clips.
Step Three- Nose Cone/Top Fairing Removal
Before you start, try and get your hand down behind the clocks to disconnect the headlamp bulbs and the side lamp bulb harness. If you can't reach them, or it or space is tight, just leave it and do it whilst removing the nose cone, either way it is no problem.
To remove the nose cone, stand in front of the bike pull the two sides of it outwards (where they rest of the mirror mounts) whilst at the same time pulling the whole nose cone towards you, it will come off very easily although note that it may not be as light as you think as the headlamp is attached to it, so support the underside of it at the same time. Then if needs be unplug the lights and side light harness whilst supporting it. If it does not come off or still seems stuck, check and see that you've removed all the necessary mentioned clips.
Step Four- Clock Dismantling and Kit Fitting
Behind the clocks, there are a total of 5 screws (brass/gold colour) with posi-drive screw heads, they need to be removed.
Pull the dash off the clocks. Stand behind the bars and pull it off. It is now time to get the kit out and fit them on, but there is a knack of doing it to get good results…..
Choose a clock to start on, it does not matter which. Using a little precision-type screwdriver remove the two little black screws on the particular clock you've picked. Now put them little screws in a safe place……..here's the critical part. Fitting the kit!
You do not "have" to remove your needles, anyone who says you do has not tried this method !
The 'tear drop' method was tried at first, as described in the original kit fitting instructions and it looked pretty horrible. So be warned!
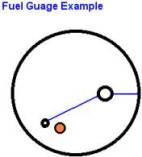
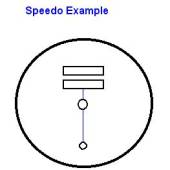
Above are examples of the best
method to use if you are not removing the needles from your clocks.
See the blue lines? That's were to cut with a sharp pair of
scissors. This enables the needle to pass through the decal and
remain completely undetectable when fitted! Tried and tested! With
the two little screws removed from each clock plate, carefully fit
the decals over the top of your existing plates and re-fit
the two little screws. Do this for each clock. If the set you're fitting to your
bike is white, you may consider painting the needles to enhance them
even further. Matt-black is the seems to be the most popular colour, Model paint is ideal as it can be
easily removed with 'turps' and so you can put the bike back to
standard whenever you wish to. If you use Tamyia paint it is actually
water soluble. Some like to fit brighter bulbs
in the back of the dash to illuminate the clocks further during
night-time use. The standard Honda bulbs are 1.5 watt (6-watts), 3
watt replacements are ideal (12 watts). Now, in the immortal words of
Haynes, reassemble in the reverse order !
One final note, when re-fitting
the screen do not put any pressure on the screws when re-fitting or
you may lose grommet!
