• Welcome to the new B.I.R.D. Forum. Please be sure to read the "New Member / New Registered ? Please Read" thread in the Coffee Shop. This contains some important information. To become a full member ( £5.90 a year ) simply click on your user name near the top on the right I hope you enjoy the new site ................ Jaws ( John )

Another Freebie

Lee337

Confused Poster
Club Sponsor
Following on from my 1993 Trophy 1200, which a friend gave me having been sat in his garden for 12 years, here's another 12 year unused Triumph.

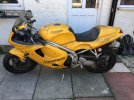
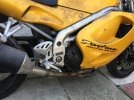
This time a 1997 Daytona T595. At some point after her (yes, it's a 'her') last MOT in March 2010 and within 500 miles from then, her radiator started leaking. The previous owner took her off the road & started using his winter hack until she could be repaired. Sadly, life got in the way and she spent two years under a cover in his parents back garden before being moved to a shed where she spent the next 10 years.

There is some service history and I have receipts for services at 4000, 6000 and 12000 miles, the last being done in April 2002.

As you can see, there's a BIG hole in her history from 2002 to 2010 when she was taken off the road, aside from MOT history from 2005 - 2010. The 2005 MOT showed 26,422 miles, so there's over 14,000 miles where I have no history.

I know that the early Daytona's were recalled to have the frame replaced after some cracked & I know this was done as the original frames were polished & the replacements powder coated but as for history, that's it.

I should point out that I picked her up in June, so I've done a little work on her in my quest to get her back on the road.
 

Attachments

  • T595 .JPG
    T595 .JPG
    370 KB · Views: 88
  • T595_2.JPG
    T595_2.JPG
    404.2 KB · Views: 89

eddyace595

Been there, and had one
Club Sponsor
Always wanted a T595....To get one for free, even one needing work is a result in my book.
Best colour too..Strontium Yellow I think.
Good luck with it and keep us all posted with the progress (y)
 

Lee337

Confused Poster
Club Sponsor
As I knew the bodywork was in pretty good order now she's had a good wash, off it came. As you would expect after 12 years, this was not without its problems. one of the lower bolts on each fairing was seized, so I had to undo the bracket from the engine to remove the fairings. I have yet to free up these bolts, but I have a tin of Plus Gas on the shelf which I'm hoping will help. All of the Dzus fasteners are corroded, so they'll have to be replaced but aside from that, so far, so good.

With the fairings off, I could get a look at the huge (& growing) list of jobs. For starters and in no particular order, all filters & fluids, a full engine service including valves, replace radiator, replace all bearings (front, back & suspension bushes) strip & rebuild front shocks, refurbish brakes all round (the rear brake pedal is seized), new battery, new tyres, new chain & sprockets, the list is endless & at this point the estimate for new/replacement parts was edging close to £1500. But where to start?

I know, I'll start with the easy bits first & empty the fuel tank of 12 year old fuel.

Having removed the tank I carefully undid all the bolts holding the fuel filter/pump plate & carefully removed it.

The smell was RANK.

I removed around 5 litres of old fuel and you wouldn't believe what state the fuel pump was in.

So here you have it, the beginning of yet another project, one to rival my trophy and probably more challenging, not least of which is how to get the Daytona (now called Daysie) on the bench. She has a single sided swingarm, so I can't just roll her on & use my paddock stand, or the centre stand - she doesn't have one.
naked bie.JPG
fuel pump.JPG
fuel tank 1.JPG
 

Lee337

Confused Poster
Club Sponsor
A bit more work over the weekend & Daysie Daytona is now on the bench. I thought I'd struck lucky when I saw a clean looking fuel plate on a well-known auction site for a reasonable price, so bought it. It wasn't until I had a really good look at it a few weeks later I realised there are two different fuel pump plates, a 14-hole plate & a 10-hole plate. You guessed it, I needed a 10 hole one & bought a 14-hole plate.

The original 10-hole plate is beyond recovery, so I’ll have to keep looking. I've yet to clean out the inside of the fuel tank but have unblocked the vent pipe & air pipe that runs through the tank. Both were blocked so I had to carefully drill them out a dodgy process anyway as I didn't want to pierce the pipe inside the tank.

I also removed the radiator, which is more sieve than anything else, as I found out when I flushed it through with clean water. There's a company, Murcia Radiator repairs I think it's called who repair/re-core radiators for far less than the cost of a new one and probably safer than buying second hand, so once it's packaged up, I'll be sending it off to them.

I've also checked the fan, which after stripping, cleaning and re-assembling, loos salvageable. I rigged up a couple of leads and connected it direct to the Trophy battery and the motor actually works, but there was a bit of a grinding noise. It turned out to be full of rust particles, so stripping & cleaning did the job. It now spins freely without any unusual noises

I removed the exhaust too which aside from a good clean seems to be ok. there's a little rattle of rust coming from the can but there is on both the Tiger & Trophy’s exhausts, so I'm not going to worry about that.

Next up was to see if I could sort out the radiator. Phoned up a company who re-cores rads but not only did they quote a min of £280, the bloke I spoke with called me 'love'. Not sure if he was assuming gender or sexual orientation, but when I told him if he had to call me anything, I'd prefer 'Sir', he was not exactly helpful.

Anyway, I found a rad online for £70 from National Triumph, which he guaranteed. Also ordered a headlight from the same place as one of the mounting brackets was broken on the one attached to the bike.

I've removed the subframe as the paint is flaking. That’ll go off to be powder coated together with a few other bits next month.

The rear undertray needs a good clean before it goes back on as does pretty much all the mechanical bits under the body work.

Not sure yet whether to keep stripping or start cleaning. Whatever I do, I'll need a bigger socket for the rear wheel nut, the biggest I have is 36mm & the nut is 46mm I believe.

Watch this space...

bench1.jpg
bench2.jpg
subframe.jpg
 

andyBeaker

Moderator
Staff member
Moderator
Club Sponsor
A bit more work over the weekend & Daysie Daytona is now on the bench. I thought I'd struck lucky when I saw a clean looking fuel plate on a well-known auction site for a reasonable price, so bought it. It wasn't until I had a really good look at it a few weeks later I realised there are two different fuel pump plates, a 14-hole plate & a 10-hole plate. You guessed it, I needed a 10 hole one & bought a 14-hole plate.

The original 10-hole plate is beyond recovery, so I’ll have to keep looking. I've yet to clean out the inside of the fuel tank but have unblocked the vent pipe & air pipe that runs through the tank. Both were blocked so I had to carefully drill them out a dodgy process anyway as I didn't want to pierce the pipe inside the tank.

I also removed the radiator, which is more sieve than anything else, as I found out when I flushed it through with clean water. There's a company, Murcia Radiator repairs I think it's called who repair/re-core radiators for far less than the cost of a new one and probably safer than buying second hand, so once it's packaged up, I'll be sending it off to them.

I've also checked the fan, which after stripping, cleaning and re-assembling, loos salvageable. I rigged up a couple of leads and connected it direct to the Trophy battery and the motor actually works, but there was a bit of a grinding noise. It turned out to be full of rust particles, so stripping & cleaning did the job. It now spins freely without any unusual noises

I removed the exhaust too which aside from a good clean seems to be ok. there's a little rattle of rust coming from the can but there is on both the Tiger & Trophy’s exhausts, so I'm not going to worry about that.

Next up was to see if I could sort out the radiator. Phoned up a company who re-cores rads but not only did they quote a min of £280, the bloke I spoke with called me 'love'. Not sure if he was assuming gender or sexual orientation, but when I told him if he had to call me anything, I'd prefer 'Sir', he was not exactly helpful.

Anyway, I found a rad online for £70 from National Triumph, which he guaranteed. Also ordered a headlight from the same place as one of the mounting brackets was broken on the one attached to the bike.

I've removed the subframe as the paint is flaking. That’ll go off to be powder coated together with a few other bits next month.

The rear undertray needs a good clean before it goes back on as does pretty much all the mechanical bits under the body work.

Not sure yet whether to keep stripping or start cleaning. Whatever I do, I'll need a bigger socket for the rear wheel nut, the biggest I have is 36mm & the nut is 46mm I believe.

Watch this space...

View attachment 72311View attachment 72312View attachment 72313
Just remember Beachy Head is always an Option.
 

Squag1

Can't remember....
Club Sponsor
 

Lee337

Confused Poster
Club Sponsor
Been in the garage cleaning up a few bits, starting with Daysies rear and her brakes. Starting off with the brakes, I've removed the front brakes, an easy task. They're in pretty good order, and the calipers have cleaned up well. Before removing the hydraulic lines, I thought I'd pump the brakes to try to make removing the pistons a little easier. I think I may have a battle on my hands though as only one of the eight pistons actually moved.

Taking the caliper off was easy, again only two bolts & they undid wilt little effort, but that's where the fun started. The brake line runs effectively insiude the chain guard and there's a plastic cover, held by two screws, both of which were seized. Lots of Plusgas, a pair of molegrips and 40 minutes later, the cover was off. Next up, there are two P clamps which hold the brake line against the chain guard. Both bolts are seized and not easy to get to without removing the chain guard. There are also four bolts holding the chain guard on, two of which are seized. More Plusgas and left to soak overnight.

Meanwhile, I decided to remove the rear brake master cylinder. I'd noticed when I got Daysie home that the rear brake pedal didn't move and it now turns out the clevis pin that attaches the brake pedal to the master cylinder plunger is... Yes, you guessed it, seized. More Plusgas. On top of which, the brake switch fell apart in my hand when I tried to remove it.

All this meant that just removing a few bolts took a lot longer than it should.

A couple of days soaking and all is now clean - I don't smell of diesel, the oil under my finger nails has pretty much gone and I no longer have to sleep in the spare room because I smell like a 1960's garage monkey.

As for Daysie, she now has clean brake calipers after soaking them in diesel for 3 days. I've managed to get all the pistons out with no damage and although some of them are a bit 'crusry' around the top, where the dust seals sat, I'll give them a good clean with some fine wire wool. I may end up replacing them anyway, so I'm not going to spend too long here.

The rear subframe, mirror brackets and the magnesium dash intrument surround went off to the powder coaters on Saturday and should be back with me in 3 - 4 weeks. He's quoted me £142 which I didn't think was too bad.

In other news, I finally removed the chain guard which was posing a problem with a couple of seized bolts, with a combination of Plusgas and mole grips. The clevis pin that attached the rear brake pedal to the rear master cylinder proved problematic. I had to remove the whole assembly and put it in the vice to try to free it up. Countless hours spent with a combination of Plusgas, pliers, molegrips and finally a hammer didn't budge it. Finally heat from my blowtorch and the hammer freed it up with no damage other than to said clevis pin.

The air box has also been removed after a fight to get it loose. It turns out Haynes Manuals do have their uses. the early Daytonas have a hidden bolt securing the front of the airbox to the frame. Another example of Triump's design mastery here, the bolt is tucked away behind the radiator and would have all but been impossible had I not already removed the radiator.

I was expecting to see three badly perished vacuum hoses running from the throttle bodies to the IACV (for the uninitiated, the Idle Air Control Valve, which I've seen referenced as ICAV IVAC IAV and stepper motor in varoius places), and I wasn't surprised - at least with the state of the vacuum hoses, but unlike the Tiger, there was no IACV to be seen.

Turns out the IACV on early models is not sat above the throttle bodies as in later models but tucked under the throttle bodies behind the clutch actuator arm. Who knew? Looks like it's going to be a PITA to get to but as at least 4 of the 6 hose connectors are not connected and two of them seem to be bunged up with crud, it's got to come out to be checked & cleaned. I have a copy of the Triumph service manual on the PC so I can see the laptop heading for the garage when it comes to this piece of work, that or the printer's going to get a hammering.

I had some Rubber & Vinyl cleaner which I used successfully on the Trophy to clean all the wiring loom and assorted plastic bits so did the same for Daysie. While I have yet to check any of the electrical system, at least everything looks clean now. I also used some parts washer solution and a rag to clean up the frame, engine and any other bits I could get to. I've still got cleaning to do, namely the wheels and those hard to get to bits at the back of the engine.

While cleaning the engine, quite a bit of the engine powder coating came off. Hardly surprising as it was sitting for so long. Most of it was around the front where antifreeze from the leaking radiator got to it. The water pump housing and the housing where the top hose goes in to the engine is also a bit ropey. It was also peeling off on the underside. Not sure what i'm going to do about this yet if anything as it's mostly covered by fairings, but as is my way, I won't be happy leaving it, so I'll have to clean it up & find some sort of engine paint just to tidy it up
 

Attachments

  • Brakes_S.jpg
    Brakes_S.jpg
    55.9 KB · Views: 68
  • small throttles.jpg
    small throttles.jpg
    63.1 KB · Views: 65
  • clean_small.jpg
    clean_small.jpg
    56.7 KB · Views: 69

Lee337

Confused Poster
Club Sponsor
Not had an update on Project Daysie for over a year, so I think it's about time I updated you. here's the condensed version.

. We left the story when a lot of cleaning was going on & little else. Since then, I've stripped down the swing arm, a single sided affair, which was a whole new experience for me. All the bearings were seized, as was the eccentric adjuster. While I tackled this, I sent a few bits off to be powder coated, including wheels, rear sub-frame, mirror brackets and the instrument surround.

The swing arm has been sorted with all new bearings, a new (well 2nd hand) shock and it's all been put back together. I've refurbished all the brakes, including new pistons, seals, pads, pins & brake lines. The front suspension has been refurbished with new seals & fluid. I had to replace the shocks as one of them was bent. Couldn't see any frame damage though, although the headstock bearing was incorrectly seated. The Headstock & front wheel bearings were all replaced, so it now rolls & bounces up & down as it should. The brakes seem all good too.

Next up was the engine. I had Mrs L turn the a wheel after I removed the spark plugs & ran the gearbox through the gears. they all seemed OK. The valves were checked & all clearances were OK and an oil & filter change, together with new oil pipes to the cooler were done. I replaced all the coolant hoses with nice shiny new silicone ones & with the 2nd hand radiator everything went back together nicely. I had a little mishap with the thermostat housing, when I broke it trying to refit the coolant temp sender. These parts are made of 100% unobtanium but fortunately a contact had a spare he was willing to sell me for the princely sum of £4.95, the cost of postage.

So, now the engine & running ger was done, it ws time to stick a battery on and see what happens.

Turns out nothing, nada, zilch. No lights, horn, not even a relay clicking. Oh, kill switch.

Flicked the kill switch & the tell-tale lights on the ash came on, a couple of relays clicked & I could hear the fuel pump whirr away, but that was it, no starter motor, horn, indicator, still no lights except the brake lights, they worked. I turned the ignition off and turned the key to 'park' the front side light came on as expected and the rear o/s indicator. Ignition off again, time to check the earths.

Undone the ones I could find, cleaned them & re-connected them. Thought I'd cracked it as one of the earth connectors attached to the sub-frame, which I'd recently had powder coated. Ignition back on and still no horn, lights, starter or lights. Time to check the fuses (again) and relays. I noticed one of the relays was hot, even with the ignition off, so pulled it & noticed that of the 7 relays in the block 1 of them was a 4-pin in a 5-pin socket, one 5-pin in a 4-pin socket (the hot one) and two had pins missing (?).

A run down to Halfrauds last weekend while I had a battery on charge & armed with new relays, I put the key in the ignition. This time, one of the headlights came on full beam, although not dipped. Swappd the bulbs for known working ones but still only the one light. But, thumbing the starter & she turned over a couple of times.

Chuffed at this new development, I thought I'd call it a day. The starter button is a little hit & miss, so I'll need to clean that & the 5-pin relay is still absent, I have one on order. I didn't check the horn and the rear o/s indicator still lights up when I switch the lights on, so I'm not there yet.

Well what do you expect, I've only been at this since June 2022
 

Lee337

Confused Poster
Club Sponsor
A bit of an update although no new pictures yet. Still struggling with the electrics. I recently pulled out my trusty multi-meter & started at the back of the bike, checking & cleaning connectors as I go. I now have rear lights, although the brake lights have now stopped working. I have new switches on both front & rear brake which I've checked, so this needs more investigation.

I'm convinced there's a massive earth issue here though. I recently fully charged the battery & checked the voltage with nothing switched on. 13.2v which seems about right, but as soon as I switch the ignition on, it drops to 11.7v. One of the headlight bulbs still lights up (it shouldn't) and the dash lights all work as they should, but the headlight bulb being o doesn't account for the draw on the battery. Besides, when I pull the bulb, it makes no difference to the voltage.

I'm slowly working my way through the wiring loom, but I thin it'll take some time as I'm out on the Tiger most chances I get.

22 Months and counting, that's almost a year longer than I took to rebuild the Trophy!
 
Top