• Welcome to the new B.I.R.D. Forum. Please be sure to read the "New Member / New Registered ? Please Read" thread in the Coffee Shop. This contains some important information. To become a full member ( £5.90 a year ) simply click on your user name near the top on the right I hope you enjoy the new site ................ Jaws ( John )

Lowered footpegs

P

Para045

Guest
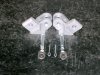
I was looking at doing this mod until I saw some peg lowering brackets that one of the guys was making on http://www.cbr1100xx.org so I got them and the difference is amazing. I will look at doing the Buells on the pillion set though for the missus :dunno: The outcome is basically the same except it retains the stock pegs which I like as the pegs still have the rubber on them :bow:
Theoldgit1 said:
Just wondering...I tend to ride distance with the balls of my feet on the pegs, old habit...Looking at your picture, what's the chance I would melt my Daytona's to the exhaust pipe with these lowered pegs? :dunno:
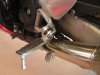
I have had this problem with my boots when I put the ball of my foot on the pegs and sit more upright ( I have VTech bars ), there are 2 melt marks on the outer rear of the heel, but then with size 14 boots that was always on the cards :eek:

Oldbull said:
Finally got my other peg... no probs fitting them as such but I have a small issue with the sidestand now hits the peg before its stop... will have a better look at it tomorrow and set the gear lever and brake pedal if it ever stops f*ggin raining..
anyone else have a prob with the sidestand ??
Oldbull said:
I cut the side stand pin off alltogether, you can still put the stand down in the normal way no probs..
If you look at the top of the stand you can see the spot where it hits the frame/stop.. I just put a blob of weld on it and gently filed it back untill it just cleared the peg .. I allso had to cut about 10mm off the rear brake adjuster shaft (threaded bar with saddle bracket on the end) to allow me to adjust the rear brake far enough..
all is good now and Im happy with the set up..
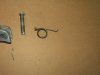
I did not want to cut and grind the sidestand so I just drilled a hole where the stand hits the stop and tapped it for a dome head screw :dunno: I also unbolted my sidestand and put a couple of big washers between the stand and the mount/frame on the front bolt to pivot the sidestand in towards the frame away from the end of the footpeg as I was worried that I may touch down the stand while cornering. I will look at making an aluminium wedge to replace the washers when I have time :dunno:

alp said:
To obtain a lower rear brake pedal position I also found it necessary to remove about 6mm from the brake cylinder piston rod and reassembled the unit without fitting the lock nut. To gain access to the brake cylinder I removed the foot rest assembly and then removed the cylinder from the assembly. Once the piston rod was accessible I used an angle grinder to shorten the rod. I had a helper to hold the unit. I screwed the clevis as far up the thread as possible until tight before reassembling.
That is what I did to mine and it worked fine, I just had to adjust the brake light so that it did not stay on sh1tehppns
 
D

davesXX01

Guest
Thanks Para; sorry to revive an old thread but I'm the one making the peg lowering brackets in the states.

If any of you are still interested in these I have plenty left.

Link to sale thread:
http://www.cbr1100xx.org/forums/index.php?showtopic=45762

I guess you have to be a member to see them, any questiond just ask!

They are $65 USD shipped to the UK or Europe.

You can Paypal me at: davrstrom@hotmail.com

attachment.php


attachment.php


Thanks all!

Dave
 

Attachments

  • PegLoweringBlocks.jpg
    PegLoweringBlocks.jpg
    92.4 KB · Views: 358
  • PICT00081.jpg
    PICT00081.jpg
    96.2 KB · Views: 366
Last edited by a moderator:
Dave, I have had trouble getting any tension in the spring once the bits are all fitted together just like in your photos ? Any idea why ??
 
D

davesXX01

Guest
It's possible you havent un-wound it enough. the left side needs to be un-wound more than the right side due to the sidestand hitting it.


Use only pliers, not heat, to un-wind.

Pic of the right side spring tweaked, left needs a little more.
 

Attachments

  • PICT00161.jpg
    PICT00161.jpg
    89.9 KB · Views: 12
D

davesXX01

Guest
One more thing all, be SURE to trim or remove your feelers as you will loose cornering clearance!

See pic 3 posts up!

Don't ask me how I know this :yo:

I personally purchased a second set of stock springs for my bike as I remove these brackets for "spirited" riding or for those that do track days.
 
Last edited by a moderator:
D

davesXX01

Guest
Geoff, saw your other post. The post offices in the states are colsed today for a holiday (Columbus day!) I'll find out tomorrow.


Dave
 
P

Para045

Guest
I got a set on the first run and they are awesome, the shipping was $7 in Dec last year to Perth West Aus so it should be about the same to NZ as it is slightly closer to the US :dunno:
 
D

davesXX01

Guest
Geoff James said:
Hi Dave,

How much for a set posted to the ends of the earth in New Zealand?

Cheers,

Geoff
Same as elsewhere in Europe, $60 USD.

Paypal me at davrstrom@hotmail.com

Thanks
 
Last edited by a moderator:

Geoff James

Registered User
That's great thanks Dave

Paypal payment sent yesterday. Looking forward to less pressure on my knees when I have my tighter leathers on!

Cheers,

Geoff
 
M

Melzibub

Guest
hi dave


paypal just sent, put in the comment box it was me from BIRD.

Cheers

melz
 
D

davesXX01

Guest
Got your Melz,

If anybody else sent me anything please contact me! I posted the wrong paypal address 4 posts up :bang:

I already fixed it!

Dave
 
Top